Customize Authentication Flows
Flows are the engine of the identity management experience, orchestrating a sequence of stages—the individual logic and verification steps that guide a user through a process. By connecting these stages and applying optional policies, you can build highly flexible workflows for logging in, recovering passwords, or platform enrollment.
Design custom Flows
Every authentication event in GlobalAI is governed by a flow. While the platform comes with default flows, you can create custom ones to meet specific security requirements.
To create a new Flow using the Admin interface:
- Access the Identity Management dashboard as an administrator.
- Navigate to Flows and Stages > Flows in the sidebar.
- Click Create to start a new flow.
- Configure the Basic Settings:
- Name: A descriptive name visible in the Admin interface.
- Title: The text displayed to the end-user when they encounter the flow.
- Slug: The URL identifier for the flow.
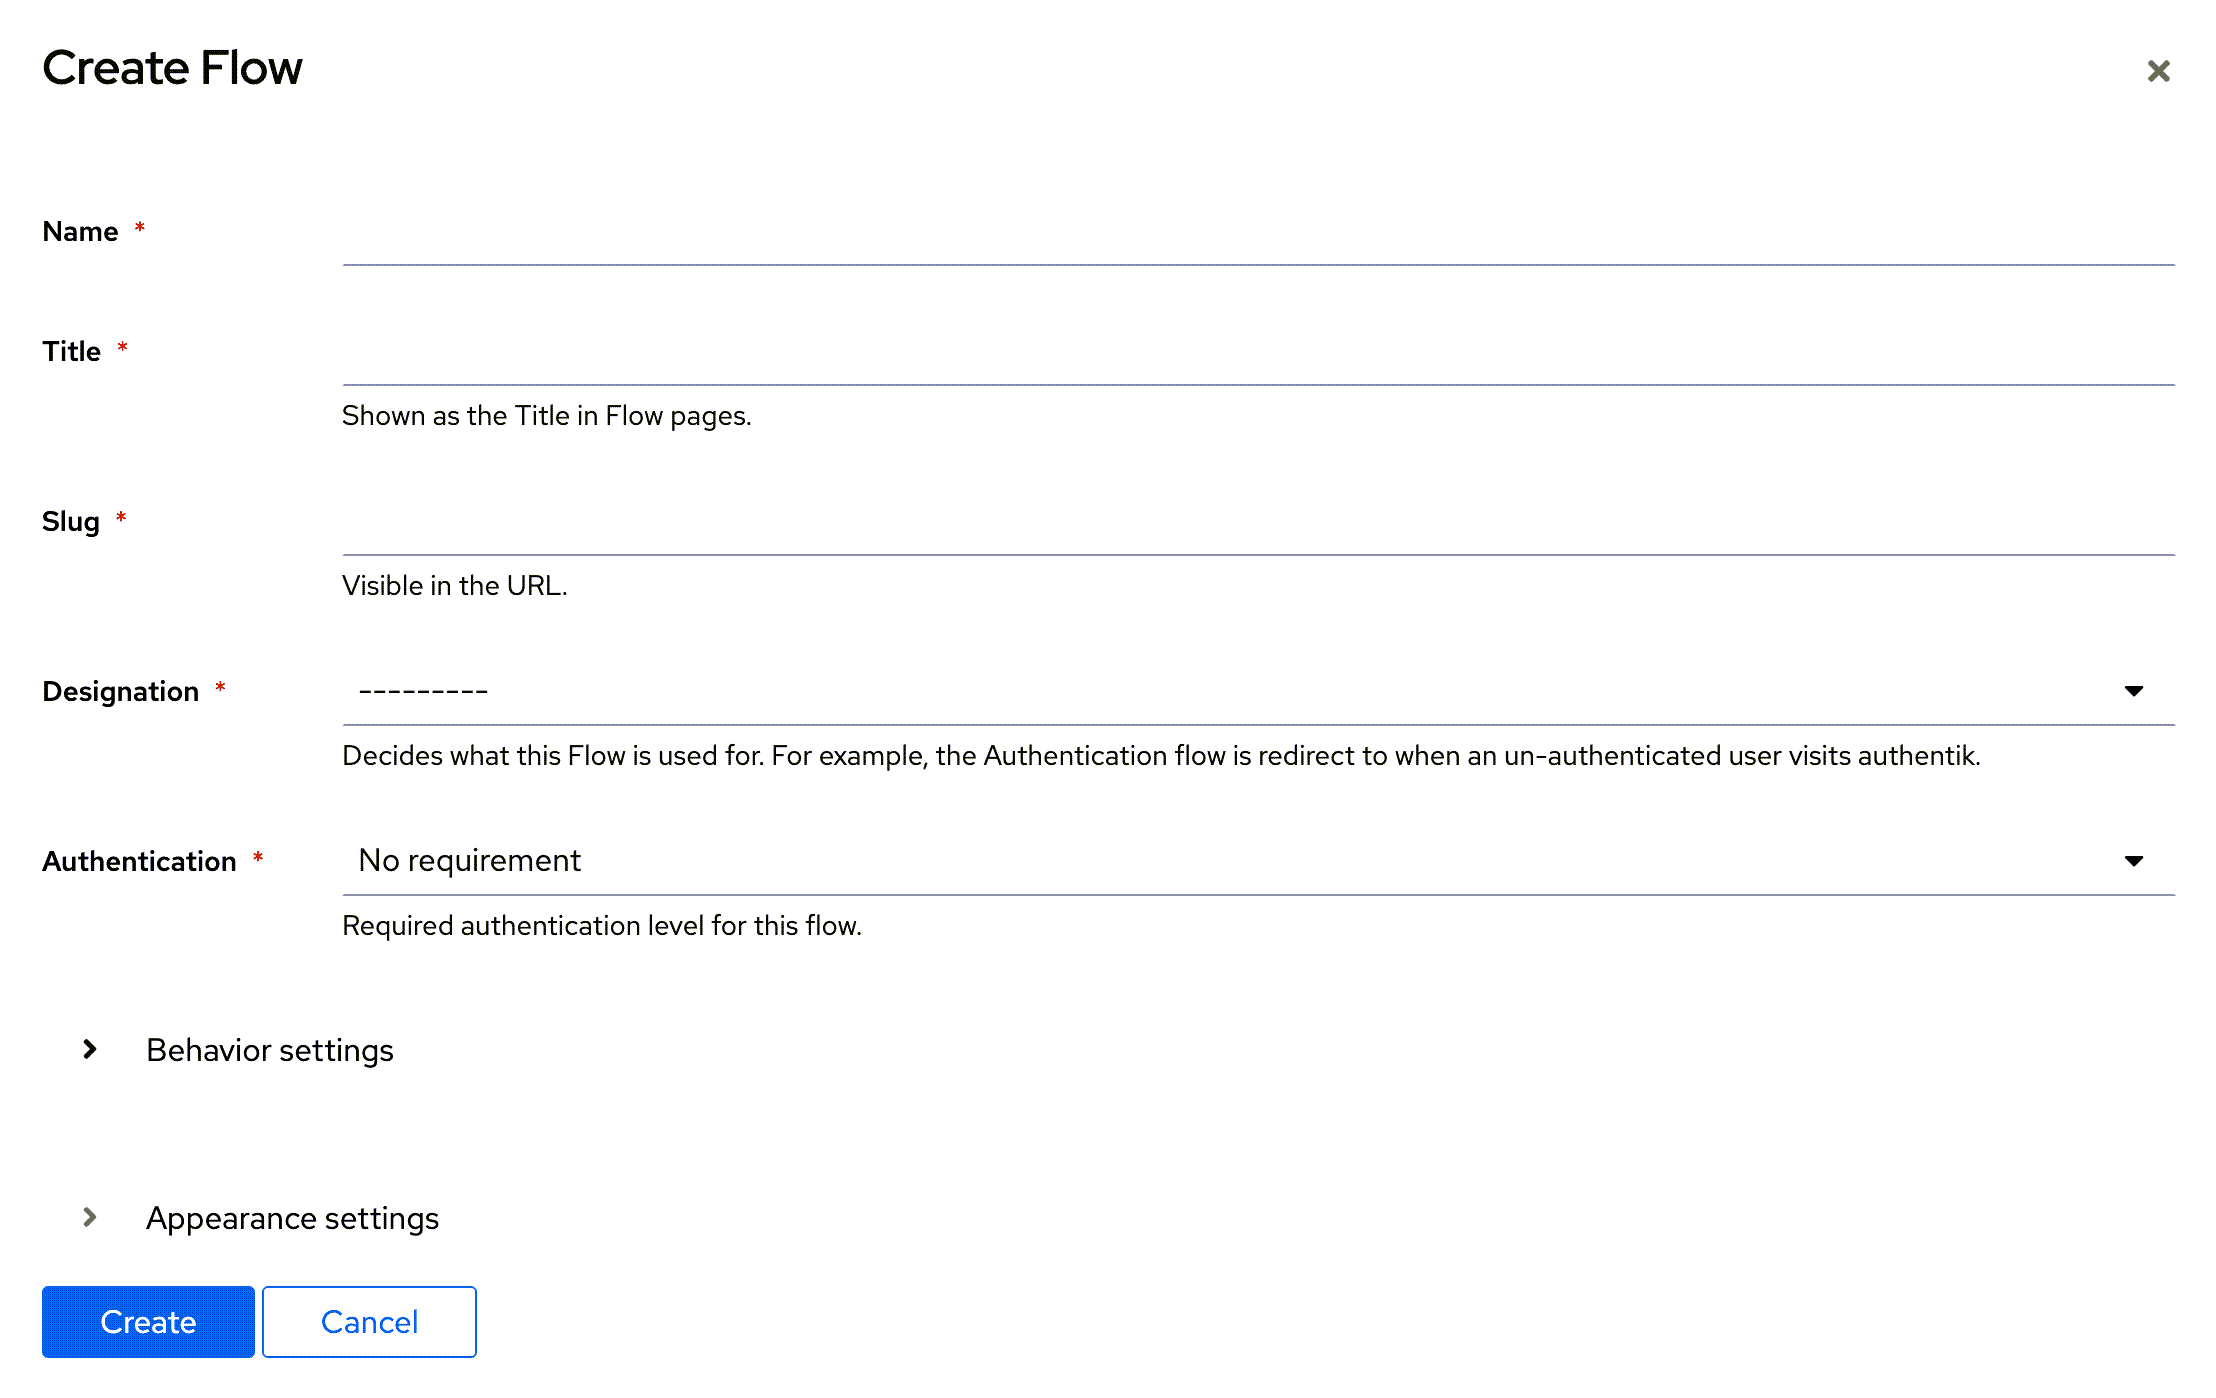
- Choose a Designation based on the flow's purpose. This determines how the flow functions and which stages are required.
Designation options
- Authentication: Used for the primary login process. This flow must contain a User Login stage to attach the user to the current session.
- Enrollment: Used for new user sign-ups. It can contain verification stages (like Email or Captcha) and must end with a User Write stage to create the new account.
- Recovery: Used for password resets. A standard recovery flow uses an Identification stage, verification stages, a Prompt stage (to ask for the new password), and a User Write stage.
- Authorization: Used to authorize applications, allowing for additional verification steps before a user accesses a specific provider.
- Stage Configuration: Used for general setup tasks, such as changing a password or setting up Two-Factor Authentication (TOTP).
- Unenrollment: Used to delete an account, requiring a user_delete stage.
- Invalidation: Used for terminating sessions.
- Define the Behavior and Appearance settings for the flow, such as compatibility mode, policy engine mode, and custom branding.
- Click Create to save the new flow.
To learn more about Flows, refer to the Flows goauthentik documentation, which provides detailed insights into the design and logic of flows and stages. GlobalAI's identity management module is built on top of goauthentik, so their concepts and best practices apply directly to your implementation.
Behavior and appearance settings
Beyond basic identity logic, you can fine-tune how the flow interacts with browsers and policies:
- Compatibility Mode: It's recommended to toggle this on if your users access flows via mobile devices or use password managers. This setting forces the interface to render a traditional DOM rather than a Shadow DOM, ensuring better compatibility with external tools like 1Password.
- Denied Action: Configures the system's response when a user fails a policy check (for example, showing an error message or redirecting to a default interface).
- Policy Engine Mode: Determines whether the flow proceeds if any attached policy passes or only if all policies pass.
- Appearance: You can customize the layout (for example, sidebar left/right) and upload a custom background image that overrides the system default.
GlobalAI comes pre-configured with several Default Flows to ensure immediate operability. These include:
- default-authentication-flow: The standard login sequence.
- default-invalidation-flow: Handles secure logouts and session termination.
- default-password-change: Used for user-initiated password updates.
- default-recovery-flow: The baseline sequence for "Forgot Password" requests.
It's highly recommended to duplicate these defaults before making significant changes, rather than editing the original system flows directly. To see a full list of default and example flows, refer to the Default Flows goauthentik documentation.
Customize text prompts
You can modify the text displayed to users during authentication without altering the flow logic. While you can edit existing prompts, creating custom prompts allows you to capture specific data (for example, RDP credentials for remote access) or provide read-only instructions.
- Navigate to Flows and Stages > Prompts.
- Click Create to define a new prompt, or click Edit on an existing one.
- Configure the following key fields:
- Name: A unique identifier for the prompt.
- Field Key: The internal variable name (for example, connection_settings.username). This maps the user's input to the system.
- Label: The text displayed above the input field to the user.
- Type: Choose the input format, for example, Text (read-only) for displaying static instructions.
- Required: Toggle this on to ensure the user can't proceed without filling this field.
- Order: Determines the sequence in which the prompt appears relative to others.
- Click Create to save your changes to apply the new text to all flows using that prompt.
Creating a prompt does not automatically add it to a flow. You must bind it to a specific stage to display it to users. For instructions on how to create a Prompt Stage and map your new fields to it, refer to the Bind Stages and Policies guide.
Configure token expiration
For flows that rely on temporary links or codes (such as Recovery or Enrollment), you can limit how long the token remains valid to ensure security.
- Navigate to Flows and Stages > Stages.
- Select the specific Email Stage used in your flow.
- Example: For a recovery flow, this is often named
default-recovery-email. For a sign-up flow, it might bedefault-enrollment-email.
- Example: For a recovery flow, this is often named
- Locate the Token expiration field.
- Set the value using the specific syntax (for example,
minutes=30,hours=1, orseconds=30). - Click Update. This ensures the link sent to the user expires if they don't act within the defined window.
Brand the interface
You can customize the look and feel of the identity interface to align with your organization’s branding.
- Configure global settins: To set the baseline look for your instance, go to the Admin Interface and click Brands under the System heading in the sidebar.
- Visuals: Upload your Title, Logo, Favicon, and a default background image.
- Advanced: Use the Attributes section to force a specific theme (for example, settings.theme.base: dark) or disable features like the search bar.
- Configure flow-specific overrides: To give a specific flow (like "Recovery") a unique look that differs from your global brand:
- Navigate to Flows and Stages > Flows.
- Edit the specific flow.
- Scroll to Appearance Settings to upload a unique background or change the layout (for example, Sidebar vs. Stacked).
Before assigning a new flow to a live application, verify that all stages and policies are firing in the correct order. Policies are evaluated dynamically right before the stage is presented to the user.
Related articles
Now that you have customized your authentication flows, you can ensure your platform remains secure by monitoring activity and expanding access.
Secure the Platform
Configure global reputation policies and event retention to protect your organization from brute-force attacks.
Bind Stages and Policies
Learn how to connect stages and policies to create dynamic, conditional flows.
Identity Provider Reference
Review the supported provider types and their specific characteristics.